
部署nginx web集群
阅读 (445959)
分享
一、案例需求
使用nginx分发器构建一个web集群
二、环境准备
实验机 :四台虚拟机,一台测试机,一台分发器,两台web服务器。
网卡:vmnet4
系统:CentOS8.0
SELinux&防火墙:关闭
网段:192.168.0.0/24
| 角色&主机名 | IP |
|---|---|
| 客户端 client | 192.168.0.10/24 |
| 分发器 nginx1 | 192.168.0.40/24 |
| web服务器 web1 | 192.168.0.42/24 |
| web服务器 web2 | 192.168.0.43/24 |
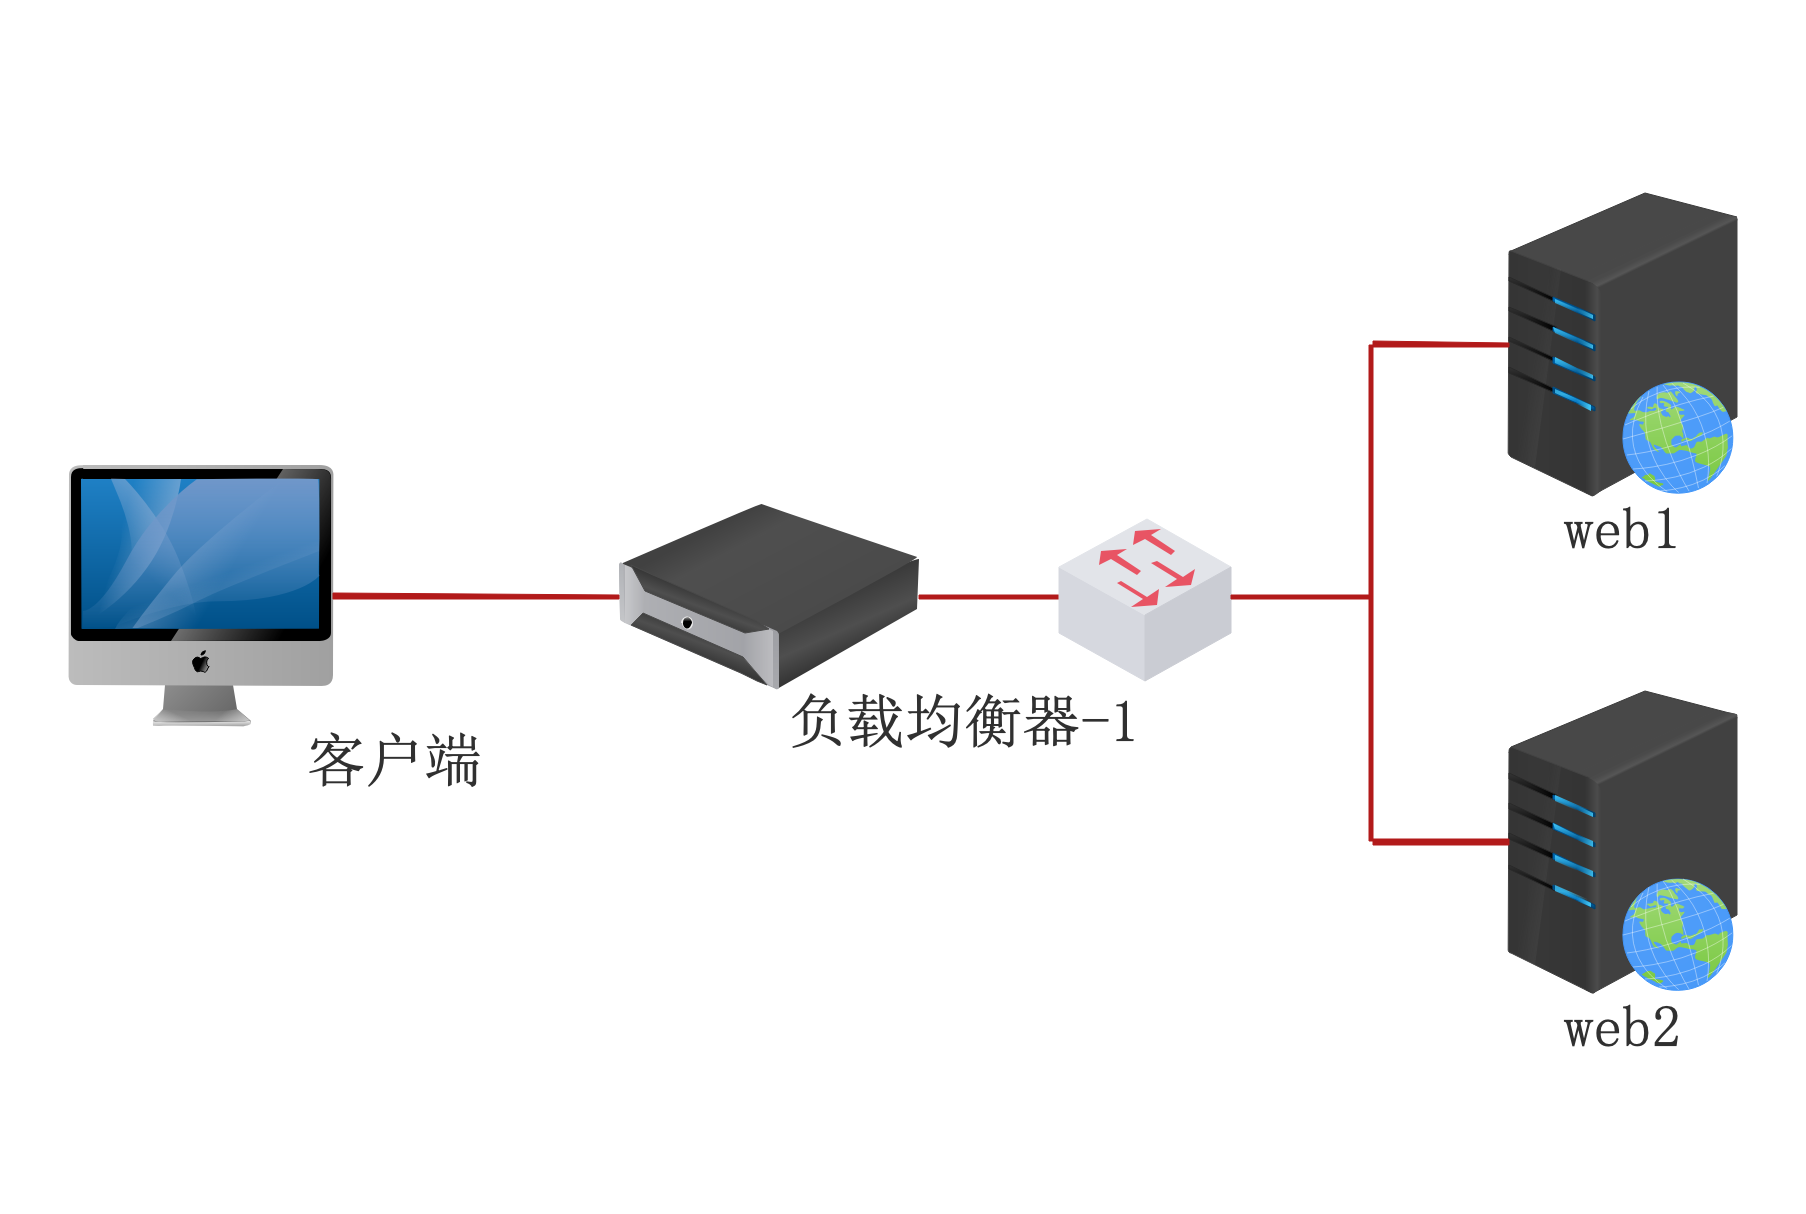
三、架构图
四、实验步骤
4.1、 配置web业务机
a、部署nginx
nginx安装脚本
#!/bin/bash

nginx_pkg='nginx-1.19.3.tar.gz'
nginx_prefix=/usr/local/nginx
html=/var/nginx
log=/var/log/nginx

check13 () {
   [ $UID -ne 0 ] && echo "need to be root to that" && exit 1
   [ ! -f $nginx_pkg ]  && echo "not found source packager" && exit 1
   [ ! -d $html ] && mkdir -p $html
   [ ! -d $log ] && mkdir -p $log
}

nginx_install () {
   source_pkg=`echo $nginx_pkg|awk -F ".tar" '{print $1}'`
   [ -d /usr/src/$source_pkg ]&&rm -rf /usr/src/$source_pkg
   tar xf $nginx_pkg -C /usr/src
   cp nginxd /usr/src/$source_pkg
    if [ $? -eq 0 ];then
        cd /usr/src/$source_pkg
        if [ $? -eq 0 ];then
            dnf -y install gcc-* pcre pcre-devel zlib zlib-devel openssl-* make*&> /dev/null
            [ $? -ne 0 ]&&"YUM set error" && exit 1
            ./configure --prefix=$nginx_prefix
            if [ $? -eq 0 ];then
                make
                if [ $? -eq 0 ];then
                    make install
                    if [ $? -eq 0 ];then
                        ln -s -f $nginx_prefix/conf/nginx.conf /etc/
                        ln -s -f $nginx_prefix/logs/ $log/logs
                        ln -s -f $nginx_prefix/html $html/html
                        ln -s -f $nginx_prefix/sbin/ /usr/sbin/
                        cp nginxd /etc/init.d/nginx;chmod 755 /etc/init.d/nginx
                    else
                                            exit 1
                    fi
                else
                    exit 1
                fi
            else
                exit 1
            fi
        else
            exit 1
        fi
    else
        exit 1
fi
 [ $? -eq 0 ]&&clear||exit
   echo -e "\n\033[32m Nginx Install Success: \033[0m"
   echo -e "\n"
   echo -e "\tNginx_conf: /etc/nginx.conf"
   echo -e "\tNginx_html: $html/html"
   echo -e "\tNginx_access_log: $log/logs/access.log"
   echo -e "\tNginx_error_log: $log/logs/error.log\n\n\n\n"
   read -n1 -p "press any key and exit...."
   echo
}

check13
nginx_install
我们在学习web服务时,涉及过nginx的安装,这个脚本只是将我们之前需要手动执行的工作变成了自动执行脚本完成的工作
-
安装nginx需要用到的软件包
-
将nginx安装到/usr/local/nginx目录下
-
页面文件可直接放在/var/nginx目录下
-
日志文件可直接查看/var/log/nginx目录下
-
配置文件可直接编辑/etc/nginx.conf
b、配置web
web1
[root@web1 ~]# dnf -y install httpd
[root@web1 ~]# echo web1 > /var/www/html/index.html
[root@web1 ~]# systemctl restart httpd
[root@web1 ~]# curl localhost
web1
[root@web2 ~]# dnf -y install httpd
[root@web2 ~]# echo web2 > /var/www/html/index.html
[root@web2 ~]# systemctl restart httpd
[root@web2 ~]# curl localhost
4.2、配置分发器
a、部署nginx分发器
[root@nginx ~]# sh nginx_install.sh
b、配置nginx
[root@nginx ~]# cd /usr/local/nginx/conf/
[root@nginx conf]# sed -i '/#/d' nginx.conf
[root@nginx conf]# sed -i '/^$/d' nginx.conf
[root@nginx ~]# vim /etc/nginx.conf
worker_processes  1;
events {
    worker_connections  1024;
}
http {
    include       mime.types;
    default_type  application/octet-stream;
    sendfile        on;
    keepalive_timeout  65;
    upstream web {    # 名为web的反向代理群组
        server 192.168.0.42;
        server 192.168.0.43;
    }
    server {
        listen       80;
        server_name  localhost;
        location / {
            proxy_pass http://web;   # 去找反向代理
        }
        error_page   500 502 503 504  /50x.html;
        location = /50x.html {
            root   html;
        }
    }
}
4.3、集群分发测试
[root@client ~]# curl 192.168.0.40
web1
[root@client ~]# curl 192.168.0.40
web2
[root@client ~]# curl 192.168.0.40
web1
[root@client ~]# curl 192.168.0.40
web2

停止一台主机的web服务
[root@web2 ~]# systemctl stop httpd
继续测试
[root@client ~]# curl 192.168.0.40
web1
[root@client ~]# curl 192.168.0.40
web1
[root@client ~]# curl 192.168.0.40
web1

由此可见nginx有自动检测后端真实服务器的功能,继续

启动web2这台主机的nginx服务,并停掉网卡
[root@web2 ~]# systemctl start httpd
[root@web2 ~]# nmcli connection down ens33
成功停用连接 "ens33"(D-Bus 活动路径:/org/freedesktop/NetworkManager/ActiveConnection/1)


继续测试
[root@client ~]# curl 192.168.0.40
web1
[root@client ~]# curl 192.168.0.40
web1
[root@client ~]# curl 192.168.0.40
web1
如果我把网卡down了,你会发现访问速度变慢 然后才能正常访问 因为down网卡相当于防火墙的DROP 知道等到超时为止
也就是说当nginx找upstream要数据的时候,upstream给nginx一个RS地址,nginx去联系这个地址发现联系不上,回去找upstream说你给我那玩意不好使,然后upstream说那我再给你一个吧,那这样的话用户永远都访问不到down掉的RS了,如果都不好使呢?你的网站就挂了。

微信扫描 获取更多学习资料
需要
登录
才可以提问哦
: